Are you tired of a dark kitchen? Do you want to add a modern, ambient glow to your space without spending a fortune? LED light strips are the perfect solution. They’re a low-cost, energy-efficient, and surprisingly simple DIY project that can completely transform the look and feel of your kitchen.
This guide will walk you through every step of the process, from planning and choosing the right products to the final installation and troubleshooting. By the end, you’ll have a beautifully lit kitchen that looks professional and feels more inviting than ever.
Section 1: The Planning Phase (What You Need to Know Before You Start)
A successful installation starts with good planning. Skipping this step can lead to a lot of frustration, so let's make sure you're prepared.
Choosing the Right LED Strips
Not all LED strips are created equal. Here’s what you need to consider before you buy.
-
Color Temperature (Kelvin): This determines the "feel" of the light.
-
Warm White (2700K - 3000K): Creates a cozy, yellowish glow, similar to traditional incandescent bulbs. Ideal for creating a relaxed, inviting atmosphere.
-
Cool White (4000K - 5000K): A brighter, more modern look. Great for task lighting where you need to see details clearly.
-
RGB: Allows you to change the color of the lights using a remote or smartphone app. Perfect for adding a fun, dynamic element.
-
Our recommendation: For under-cabinet lighting, a warm or neutral white (3000K - 4000K) is generally the most popular choice as it provides both a warm glow and good task lighting.
-
-
Brightness (Lumens): This is how bright the lights will be. For under-cabinet lighting, we recommend a brightness of at least 400-500 lumens per foot for effective task lighting.
Essential Components Checklist
Gathering all your parts before you start will save you from making extra trips to the hardware store. Here’s everything you’ll need:
-
LED Light Strips: xtremecables.com/collections/led-lighting
-
Power Supply: Also called a driver or transformer. This converts your household current to the low voltage (12V or 24V) required by the LEDs. [Click Here to see our power-surges]
-
Connectors: Used to connect strips around corners or to the power supply without soldering.
-
LED Dimmer/Controller: A must-have for setting the perfect mood.
-
Tools: Measuring tape, scissors, wire strippers, and a ladder or step stool.
Taking Accurate Measurements
Grab your tape measure and measure the length of each cabinet section where you plan to install the lights. With some LED Light Strips you don't need to worry about being too precise, as some LED strips can be cut at designated marks, usually every few inches. It’s always better to have a little extra than to come up short. Such as these [Click Here to See the Cut and Customizable Strips]
Section 2: The Step-by-Step Installation Guide
Now that you have all your parts, let's get to work!
Step 1: Clean the Surface
This is a critical, and often overlooked, step. Use a damp cloth to wipe down the underside of your cabinets to remove any dust, grease, or grime. Allow the surface to dry completely. A clean surface ensures the adhesive on your LED strips will stick firmly.
Step 2: Cut the LED Strips to Size
If you have the applicable LED strips have small copper pads with a scissor icon on them, indicating where they can be safely cut. Use a pair of sharp scissors to cut each strip to the length of your cabinet sections.
Step 3: Connect the Strips
If you have multiple sections, you'll need to use connectors to run the wires between them. Simply slide the end of your strip into the connector and snap it shut. If you're running wires around a corner, these connectors make the process seamless.
Step 4: Prepare the Power Supply
Connect the wires of your power supply to the first section of your LED strip. The wires must be connected correctly to ensure the lights work.
Step 5: Test Everything!
Before you peel off the adhesive backing, plug in your power supply and test your entire setup. Make sure every section lights up correctly and that the dimmer or controller is working. This simple step can save you from a lot of frustration down the road.
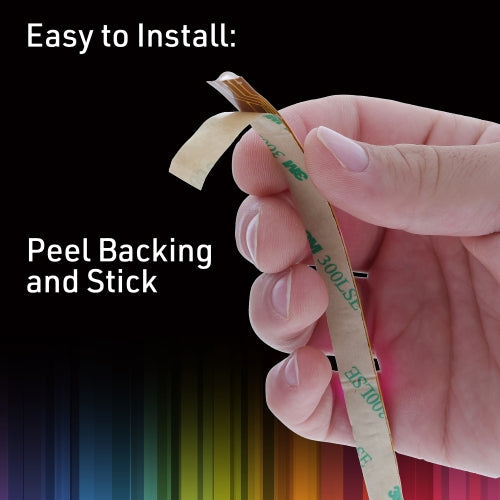
Step 6: Mount the Strips
Once you’ve confirmed everything is working, peel off the adhesive backing and carefully press the LED strips into place. For the best effect, mount the strips slightly back from the front lip of the cabinet. This will hide the light source and prevent a glare on your countertops.
Step 7: Hide the Wires
Tuck away any excess wires using wire clips or small cable ties. You can also run the wires along the back of the cabinets or through small, drilled holes for a truly professional, invisible look.
Section 3: Troubleshooting Common Issues
Did something go wrong? Don't worry, here are solutions to some of the most common problems.
-
Problem: The lights are dimming at the end of the run.
-
Solution: This is called voltage drop. It happens on very long runs (usually over 16 feet with a 12V system). To fix this, you can run a parallel wire from the power supply to the end of the strip or use a 24V system for longer distances.
-
-
Problem: The lights won't turn on at all.
-
Solution: Double-check all your connections. Make sure the plug is correctly inserted to the power adapter, and that the power supply is plugged in and working properly.
-
-
Problem: The adhesive isn't sticking.
-
Solution: The surface likely wasn't cleaned properly. You can try a stronger double-sided tape for a more permanent solution which provide a solid mounting surface.
-
Ready to Light Up Your Kitchen?
Installing under-cabinet lighting is one of the most impactful and affordable home improvement projects you can take on. It’s a rewarding DIY task that you can complete in just a few hours.
Ready to start your project? Browse our full selection of LED light strips and accessories (Click here to See led-lighting) to get everything you need for a stunning kitchen transformation!

4 comments
Kassy
Why when I set my lights to a solid color and dim them, it will switch to red and won’t let me do anything. I have to unplug it and turn it back on. If I dim it lightly it will work but mid way or all the way lowered it will change to red and I can’t even shit it off nothing without unplugging it? How do I fix this issue?
Randy Kimmel
what size are the wires 10 MM 4 Pin ?
Cody
I bought 2 Xtreme lit cut & customize multi-color light strip 50ft lights. The one strand really works well as intended. However the second strand of lights only work when I hold the cord in a certain position near the base of the cord were the connector is (almost a 90 degree bend to work). This was not noticed during testing before I installed them to the wall unfortunately. I can send video/photos if requested but wanted to send my slightly frustrated thoughts. Will probably just end up removing bad strand and replacing with a newly purchased strand. Otherwise great product!
Karen
No me acuerdo de mi contra Y no sé cómo acseder ala apo
Leave a comment
This site is protected by hCaptcha and the hCaptcha Privacy Policy and Terms of Service apply.